
Food photography is an incredibly rewarding aspect of food blogging, offering a creative outlet to capture the essence and appeal of delicious recipes. The journey of transforming raw ingredients into a visually stunning dish is only half the fun; the other half lies in presenting it to the world in its most appetizing form. Crafting beautiful images that entice viewers and make them crave your culinary creations is both a delightful challenge and a powerful art form. It’s about more than just snapping a picture; it’s about telling a story, evoking emotion, and ultimately, making stomachs rumble.
A pivotal element in producing truly drool-worthy food photos, images that leap off the screen and captivate your audience, is expert photo editing. Through careful and considered editing, you don’t just correct flaws; you infuse your images with a unique style, establish a distinct mood, and cultivate a signature “look” that becomes synonymous with your brand. Editing allows you to enhance colors, refine textures, and draw the viewer’s eye exactly where you want it, transforming a good photo into an unforgettable visual feast.
If you’re embarking on your food photography journey and are relatively new to the craft, we highly recommend exploring our foundational guide on Food Photography Tips for Beginners. Building a solid understanding of composition, lighting, and styling will provide an excellent springboard before you delve into the intricate world of post-processing and photo editing techniques.
Elevating Your Food Photos: Editing with Adobe Lightroom for Desktop
When it comes to professional photo editing, Adobe Lightroom stands out as the undisputed leader and the preferred choice for photographers across all genres, including food photography. This powerful, professional-grade software offers unparalleled flexibility and an extensive suite of tools designed to help you transform raw captures into stunning visual masterpieces. Lightroom provides a non-destructive editing environment, meaning your original images are always safe, allowing you to experiment freely and revisit adjustments at any time.
While Adobe Lightroom is a subscription-based program, typically costing around $9.99 per month as part of Adobe’s Creative Cloud Photography Plan (which often includes Photoshop), it’s an investment that pays dividends for anyone serious about elevating their photography. The value extends beyond just the editing capabilities; it includes robust organizational features, cloud storage, and seamless integration with other Adobe products. If you’re on the fence, Lightroom thoughtfully offers a 7-day free trial, providing a fantastic opportunity to experience its capabilities firsthand before committing.
For the purpose of this comprehensive guide, Adobe Lightroom will be our primary tool. However, it’s worth noting that the fundamental editing principles and techniques we’ll discuss are broadly applicable and can be adapted for use in most other reputable photo editing software.
Editing On-The-Go: Adobe Lightroom for Mobile
Are you currently capturing your delectable food photos directly with your smartphone and prefer the convenience of editing on a mobile device? Absolutely no problem! Adobe extends its powerful capabilities to your fingertips with a robust and feature-rich free Lightroom mobile app. This intuitive application boasts many of the same essential features found in its desktop counterpart, making professional-grade editing accessible from anywhere.
The beauty of the Lightroom mobile app lies in its accessibility and the seamless synchronization with the desktop version (for Creative Cloud subscribers). This means you can start an edit on your phone and pick it up on your computer, or vice-versa. Even without a subscription, the free mobile app offers a comprehensive set of tools. Simply follow along with the tips and techniques outlined in this guide, and you’ll find similar features within the mobile app to apply these expert adjustments to your photos with ease.
5 Essential Editing Tips for Captivating, Drool-Worthy Food Photos
Now that we’re equipped with the right tools, let’s dive into the core editing techniques that will transform your food photos from ordinary to extraordinary. These five essential tips are designed to add depth, vibrancy, and a professional polish to your culinary imagery.
1. Master Your White Balance: The Foundation of Natural Colors
White balance, controlled by the “Temperature” (Temp) and “Tint” sliders in Lightroom, is paramount for accurate and appealing food photography. It dictates the overall color cast of your image, influencing how warm or cool your photo appears. When an image is captured, various lighting conditions—be it natural daylight, artificial indoor lighting, or mixed sources—can introduce an unwanted color cast, making your food look too blue (cool) or too orange (warm), or sometimes even greenish or magenta.
The goal for appetizing food images is typically a neutral, balanced white balance. Food needs to look true to life and inviting; overly cool tones can make dishes appear unappetizingly cold or sterile, while excessive warmth can make them look artificial or oversaturated. You want to achieve that “just right” visual temperature that reflects the true, delicious colors of your dish.
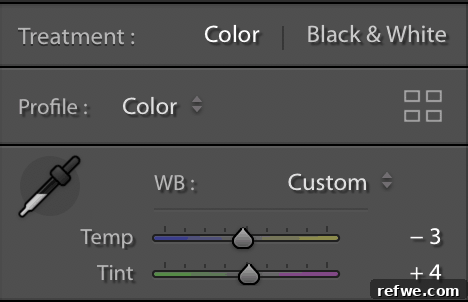
Beyond temperature, the “Tint” slider addresses green-magenta color shifts, which can also be caused by various environmental factors or specific light sources. Again, the general aim is neutrality. However, skilled photographers can strategically use a slight green or magenta tint to create a distinctive stylistic choice, adding a unique mood or artistic flair to their collection of images. This demonstrates the fine line between correcting and creating.


- Pictured left: Cookies straight out of the camera, exhibiting an undesirable cool temperature.
- Pictured right: The same cookies, now revitalized with precise white balance adjustments, showcasing a more inviting appearance.
Key Takeaway: Experiment actively with both the Temp and Tint sliders. Move them gently and incrementally in both directions, observing how the colors shift. Your aim is to discover that perfect equilibrium that renders your food in its most appealing and realistic light, making it truly irresistible to the eye. This careful calibration is foundational to professional food photography.
2. Inject Depth with an S-Curve: The Secret to Dynamic Contrast
The Tone Curve is one of Lightroom’s most powerful and versatile tools, representing the entire tonal range of your image from the deepest shadows to the brightest highlights. It empowers you to meticulously control brightness and contrast, allowing for subtle enhancements or dramatic stylistic transformations. Consistently applying a similar tone curve across your entire body of work is a fantastic way to forge a cohesive visual identity and a recognizable signature style for your food photography.
While the tone curve offers a vast landscape for advanced adjustments, we’ll focus on a fundamental yet incredibly impactful application: creating an “S-curve.” This technique is a cornerstone for adding instant depth and a vibrant punch to your food photos without over-processing them.
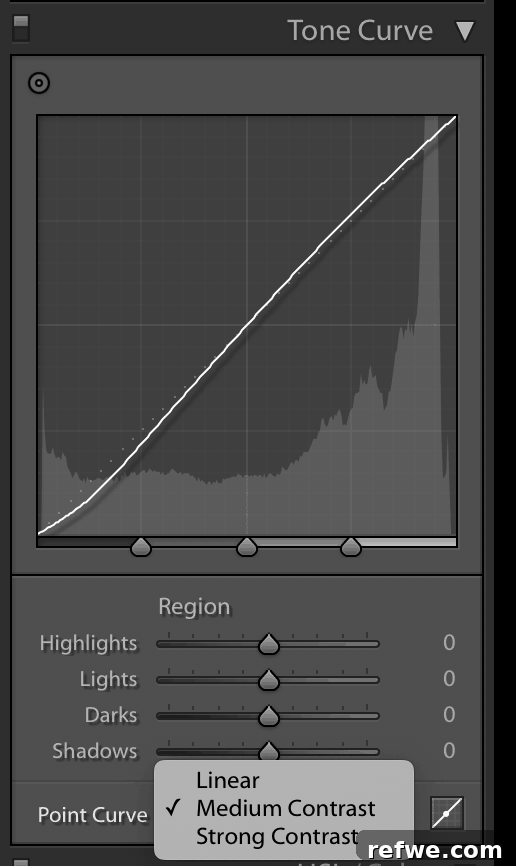
As its name suggests, an S-curve visually resembles the letter ‘S’ on the graph. This shape is created by darkening the shadows (pulling down the lower part of the curve) and brightening the highlights (pushing up the upper part of the curve), which effectively increases the overall contrast in a pleasing, natural manner. Conveniently, Lightroom simplifies this process immensely. You can achieve a subtle S-curve with just a single click by selecting the “medium contrast” or “strong contrast” preset options, as clearly demonstrated in the image above. This saves time while still delivering impactful results.


- Pictured left: Pad Thai, as captured directly from the camera, appearing somewhat flat in terms of contrast.
- Pictured right: The same Pad Thai, significantly enhanced by the application of a medium-contrast tone curve, adding depth and vibrancy.
Key Takeaway: An S-curve is an invaluable tool for adding instant depth and a lively visual punch to your food images, making them more engaging and dynamic. While the presets are a great starting point, don’t hesitate to fine-tune the curve manually. By experimenting with the specific points on the curve, you can cultivate a truly unique and personalized style that sets your food photography apart.
3. Crisp Your Image: Bringing Out Mouth-Watering Detail
This category encompasses a collection of my go-to tools for truly making food photos “crisp,” the kind of images that compel viewers to reach through the screen and take a bite. These adjustments are the secret sauce to making textures pop, details sing, and your food look irresistibly fresh. Together, they enhance the tactile appeal of your dishes, transforming them into a sensory experience.
I typically group four distinct yet complementary tools into this essential crisping category:
- Texture: This slider subtly enhances micro-contrast, bringing out fine details in your image without introducing unwanted noise or harshness. It’s perfect for highlighting the rough crust of bread, the individual grains of rice, or the delicate sprinkle of herbs.
- Clarity: Functioning as a mid-tone contrast enhancer, Clarity adds a sense of “punch” and definition to your photo. It can make elements appear more solid and defined, though it’s crucial to use it sparingly to avoid an unnatural, HDR-like halo effect around edges.
- Dehaze: Originally designed for landscapes to reduce atmospheric haze, Dehaze is surprisingly effective in food photography. It can reduce any slight haziness that might dull your image, making colors more vibrant and blacks deeper, or, used in reverse, can create a softer, dreamier aesthetic.
- Sharpening with Masking: This tool specifically refines the edges of subjects in your image, making them appear more defined and in focus. The “masking” component is crucial as it allows you to apply sharpening only where it’s most needed, preventing noise in smooth, out-of-focus areas.
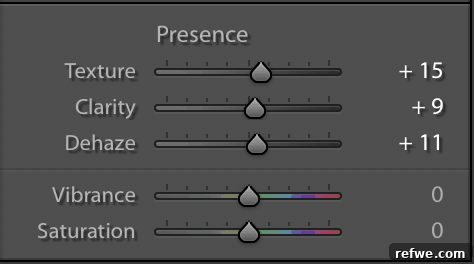
You’ll find Texture, Clarity, and Dehaze conveniently located within the Basic panel of Lightroom’s Develop module. To apply these enhancements, simply drag their respective sliders back and forth. Observe the subtle yet significant changes to your image, adjusting until you achieve a pleasing level of crispness and detail that aligns with your vision.
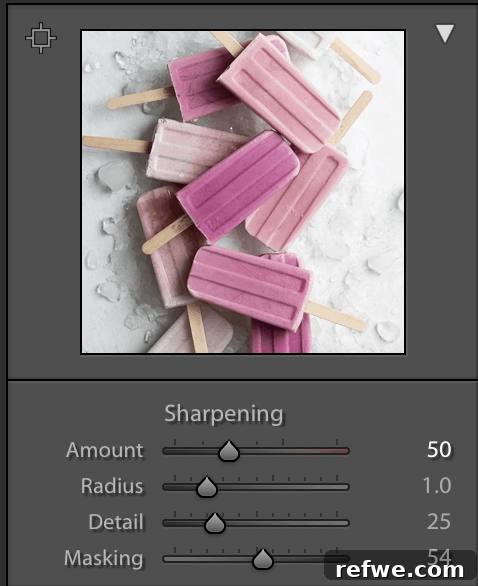
Applying sharpening with masking involves a clever “secret” step for optimal results. First, apply a general amount of sharpening to your image (a range of 25-60 is often a good starting point, but adjust based on your image). Then, crucial for precision, hold down the ‘Alt’ key (Option key on Mac) on your keyboard as you interact with the Masking slider. As you drag the Masking slider, your image will transform into a black-and-white ‘X-ray’ view. The white areas indicate where the sharpening is being applied, while the black areas are being protected. Continue dragging the slider until you see a clear X-ray representation that highlights only the essential edges of your food, leaving smooth areas unaffected. This ensures your sharpening is precise and free of unwanted digital noise.
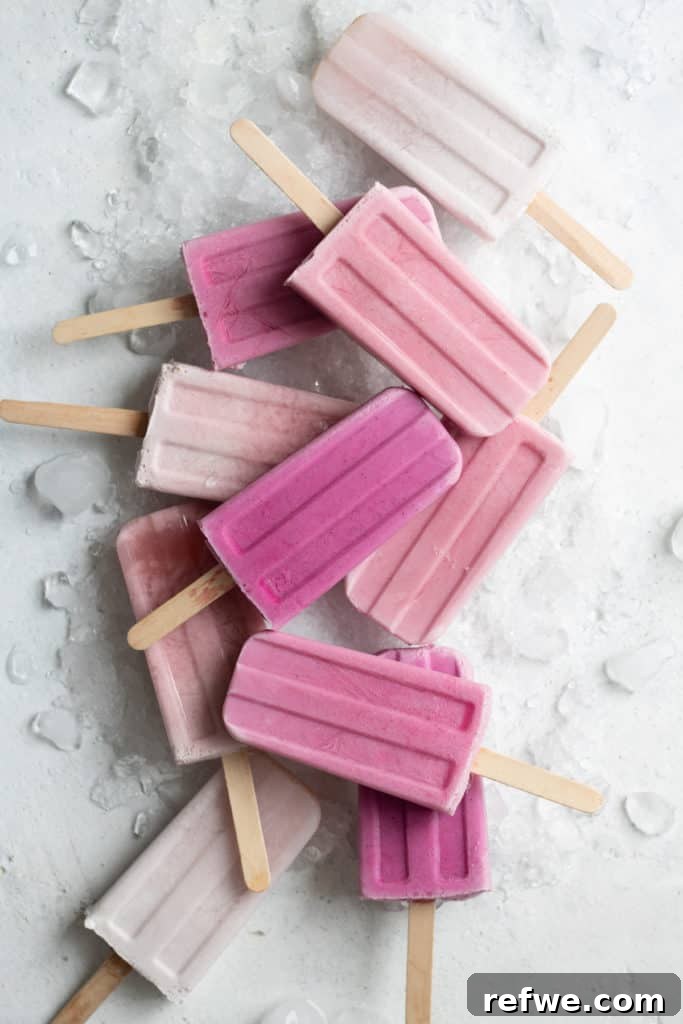
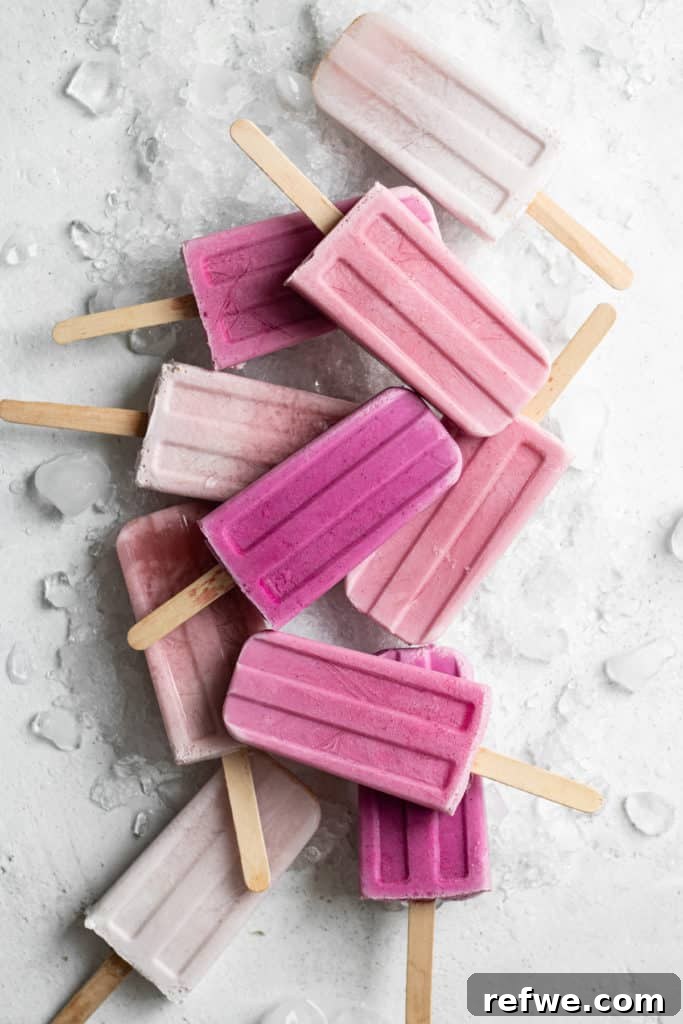
- Pictured left: Raspberry creamsicles straight from the camera, exhibiting softer details.
- Pictured right: The same raspberry creamsicles, now vibrantly enhanced with adjustments to texture, clarity, dehaze, and precise sharpening, showcasing their irresistible details.
Key Takeaway: These four adjustments—Texture, Clarity, Dehaze, and Sharpening with Masking—are potent tools for bringing out the delicious details in your food. Remember that each photo is unique; you may not need to use all four tools on every image, or the intensity of each adjustment may vary. Experiment to find the perfect balance that makes your food look its absolute best, without over-processing or creating an artificial appearance.
4. Harness the Power of Selective Editing: Spotlighting Your Culinary Star
Selective editing is a game-changer in food photography, allowing you to target and adjust only specific areas of an image without affecting the entire composition. Imagine you have a beautifully plated bowl of soup; the background might be perfectly bright, but the soup itself appears a little too dark or lacking in vibrancy. With selective editing, you can precisely brighten and enhance *just* the soup, leaving the rest of the image untouched and perfectly balanced. This level of control is crucial for guiding the viewer’s eye and emphasizing the “hero” of your dish.
In Adobe Lightroom, the primary tool for this precision work is the Adjustment Brush. To use it, simply select the brush and paint over the specific area of your image that you wish to modify. For visual confirmation, you can press the “O” key on your keyboard to toggle a red overlay on and off, which clearly indicates the areas you’ve brushed over. This ensures accuracy and prevents accidental adjustments to unintended parts of your photo.
Once you’ve meticulously brushed over the desired area, use the dedicated adjustment panel that appears to make specific modifications to your selection. You can adjust exposure, contrast, highlights, shadows, white balance, saturation, and even apply sharpening or noise reduction—all localized to your brushed area. This granular control allows for incredible refinement and artistic expression.
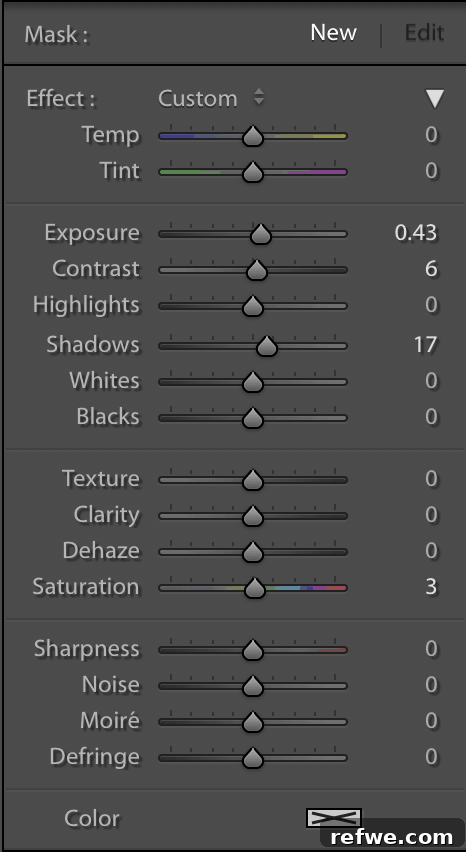
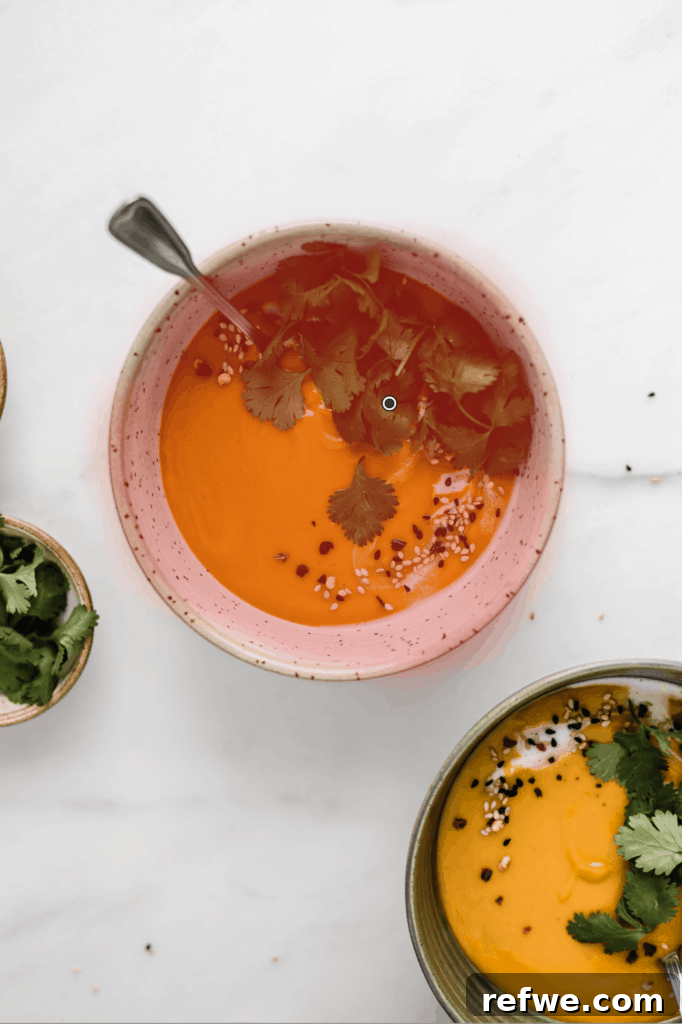
I frequently employ the Adjustment Brush to draw attention to the most important element—the “hero” of my image. This might involve subtly brightening a garnish, enhancing the texture of a main ingredient, or adding a touch of saturation to a key color. Conversely, I also use it to make small, corrective adjustments to areas that might be slightly too bright or too dark, or to mute distracting elements, all without impacting the overall exposure or tone of the entire photograph. This level of fine-tuning is what elevates a good food photo to a professional standard.
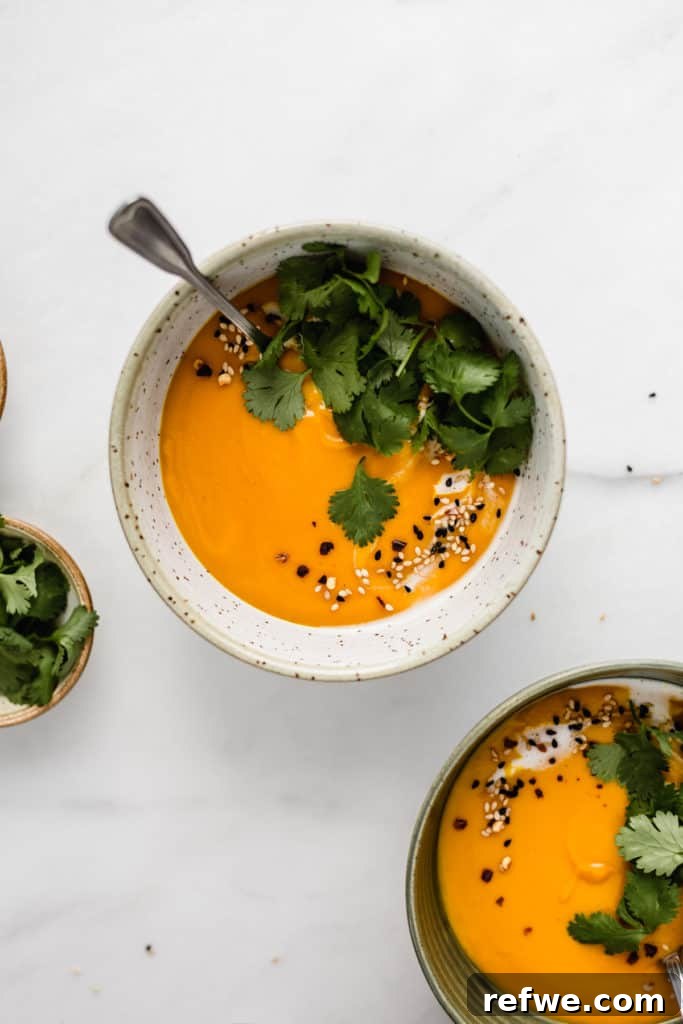
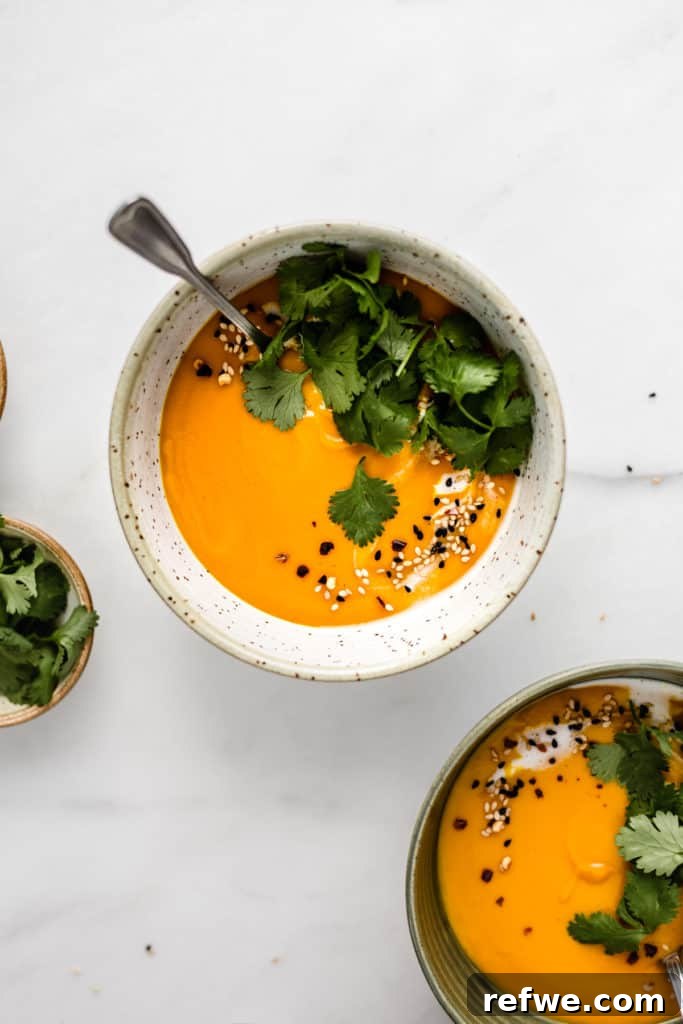
- Pictured left: Butternut squash soup on a marble board, with only minor overall adjustments applied.
- Pictured right: The same butternut squash soup, transformed by strategic selective editing, making the soup itself pop with enhanced vibrancy and appeal.
Key Takeaway: Employ selective editing whenever you need to adjust a single, specific element within your image without applying those changes to the entire photograph. This precision tool allows you to refine details, correct localized issues, and subtly guide the viewer’s attention, ensuring your food takes center stage and looks its absolute best.
5. Heal Imperfections: Polishing Your Presentation to Perfection
Let’s be realistic: sometimes our culinary creations don’t come out *exactly* as picture-perfect as we envisioned, or unwelcome guests like stray crumbs, smudges, or even sneaky pet hairs decide to make an appearance in our carefully plated dish. This is where Lightroom’s Spot Removal tool becomes an indispensable asset, acting as your digital clean-up crew to effortlessly eliminate any unwanted imperfections from your food photos.
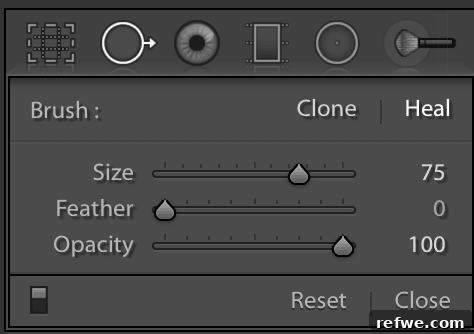
The Spot Removal tool is remarkably intelligent; in most cases, it intuitively samples an appropriate area of your image to seamlessly cover the imperfection. It works by either “healing” (blending the texture and color of the surrounding area) or “cloning” (directly copying pixels from a source area). While the tool often gets it right on the first try, you always have the flexibility to manually adjust the source area it uses for replacement. This ensures a flawless repair, allowing you to perfectly match textures and lighting, even for trickier imperfections.
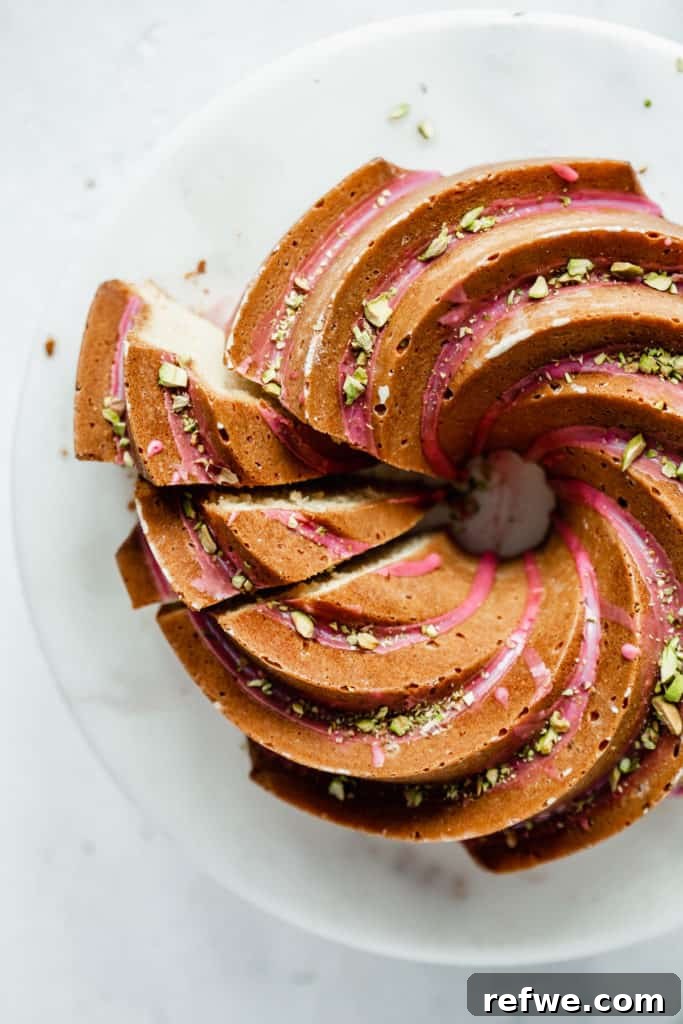
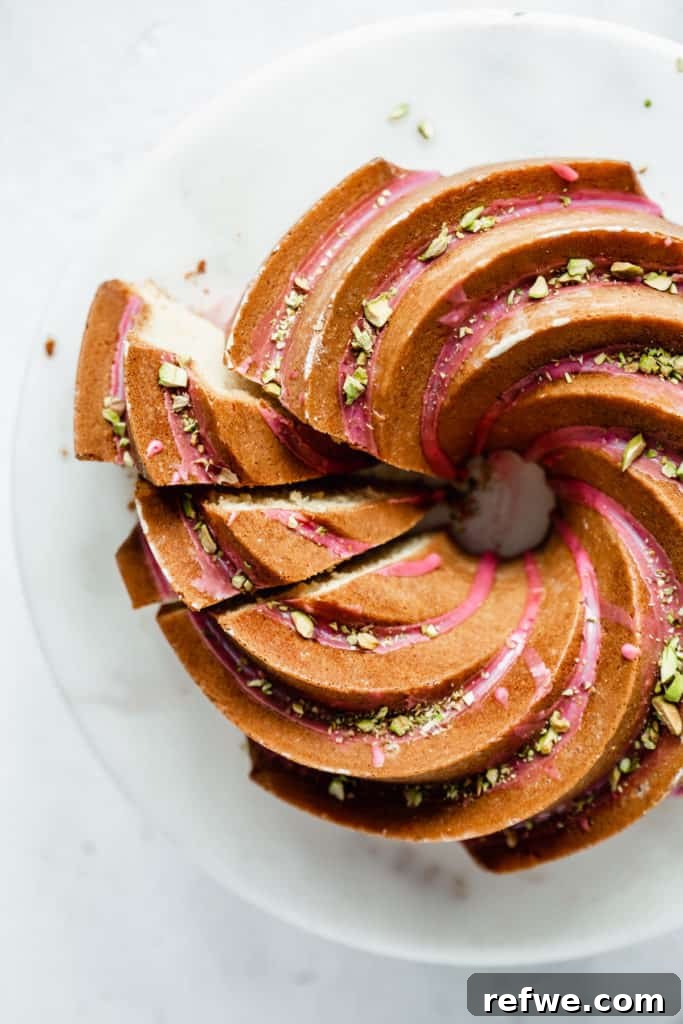
- Pictured left: An orange bundt cake displaying small cracks on its surface, likely due to improper greasing of the pan.
- Pictured right: The same orange bundt cake, now flawlessly perfected with all the unsightly holes and cracks expertly healed and removed using the Spot Removal tool.
Key Takeaway: The Spot Removal tool is invaluable for tidying up those minor, yet distracting, elements that can detract from an otherwise beautiful food photograph. You might not need it for every image, but it’s an excellent resource for cleaning up crumbs, stray drops, dust, hairs, or any other pesky imperfections that only become noticeable once you begin the editing process. It ensures your final presentation is polished, professional, and entirely focused on the deliciousness of your food.
Final Takeaways: Mastering Your Food Photography Vision
Adobe Lightroom is an incredibly powerful and versatile program, brimming with an extensive array of features designed to help you create truly stunning photographs. The five tips we’ve explored—adjusting white balance, adding an S-curve, crisping details, using selective editing, and healing imperfections—represent a selection of my personal favorite and most frequently used tools. These techniques offer a streamlined yet effective pathway to quickly transforming your food photos into captivating, drool-worthy images that resonate with your audience.
Remember that editing is not just about correction; it’s about creative expression and refining your unique visual voice. Experimentation and practice are key to mastering these tools and developing a style that is distinctly yours. With each adjustment, you are one step closer to producing professional-grade food photography that inspires and delights.
Do you have any other indispensable editing tools or cherished techniques that you love to use in your food photography workflow? We’d love to hear about them! Please share your insights and experiences in the comments section below!